Showing posts with label baby. Show all posts

Thursday, April 11, 2013

Finished!

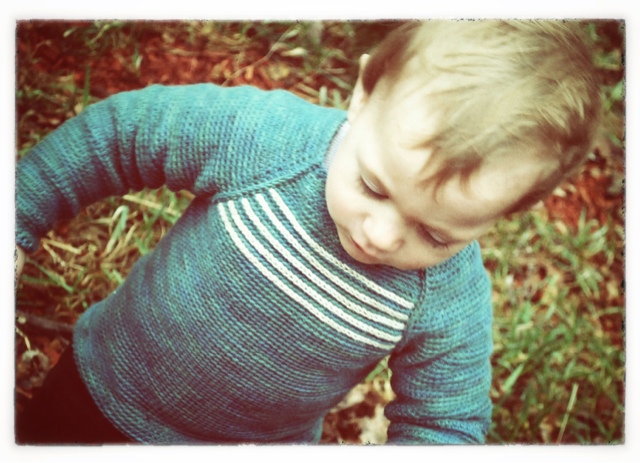
The sweater for little L. is finished. I was not sure this morning that neither the weather nor little L. would cooperate for a little photoshoot, but the stars must have been smiling on me! It did not rain, and my adorable little man was in the mood to explore our still wintery back yard.


The sweater, which by the way he loves,  fits like a glove. I know for sure he loves it because right after we put it on, he rubbed his belly, and said "it's beau", mixing French and English as he often does, and beau of course meaning beautiful. It is fitted enough to be be modern, while still having enough ease, for easy play.


The neckline is big enough for the head to go through, and for the sweater to sit on the shoulders perfectly. There are no buttons as I wanted the whole sweater to be crocheted in the round. Who does not like a seamless project?!


I am really fond of the overlay work with the stripes and the diagonal  lines on the raglans. These diagonal lines really add definition to the raglans, highlighting the shaping by looking like a faux seam, and framing the oatmeal stripes.


I kept the back simple, without a yoke design, only highlighting the raglan shaping with some overlay lines. I really like this sweater, and the fact that it is not girly, making it perfect for little boys, though I am sure it would look equally nice on a little girl. I am thinking of offering it as a pattern? What do you think?


Wednesday, April 10, 2013

Overlay Crochet Stripes

So, yesterday I told you I was excited because I was going to make the stripes for little L.'s sweater. What I did not tell you was that I had a plan for the stripes. I had decided to do the stripes using the overlay crochet technique. Instead of crocheting the stripes as you go, and getting a join when you switch colors, I decided to crochet the entire yoke with the blue single crotchets through the back loops. Once the sweater was finished, I went back and slipped stitched my oatmeal stripes securing them on the single crochet posts. This technique allowed me to make the stripes thin, with a texture contrasting with the background, and only on the front of the sweater. I love the overlay technique!


I finished the overlay work, and the weaving in of the ends just before writing this post. I will take pictures of the finished sweater tomorrow. Hopefully little L. will be willing to model for us!

Tuesday, April 9, 2013

Joined!

The sleeves and the body of little L.'s sweater are joined! I placed markers at the four intersections of the sleeves and body to mark the spots for my decreases. I forgot to say that I opted for a raglan sweater. My decreases are paired on each sides of the markers.


I plan on crocheting for about an inch before putting oatmeal stripes in my design.
I have almost an inch, and I can hardly wait to stripe! I will be using the same Misti Alpaca Cotton Silk mix in a lovely tone on tone oatmeal.


Monday, April 8, 2013

Sleeves

I made a little more progress on the sweater for little L. I finished one sleeve and am almost done with the other.
As I did for the body of the sweater, I am crocheting the sleeves in the round. I placed the paired increases on the underside of the arm, evenly spaced a few stitches apart, and at regular intervals. I love the way the increases are there without being there.


Little discrete pearly bumps going up the arm, adding structure, and smoothly enlarging the sleeve to fit cute chubby arms.


I am more and more in love with the yarn (Misti Alpaca cotton silk) and the stitch pattern (single crotchets through the back loops in the round) as well as the round, seamless construction. This is going to be such a comfy, soft, light summer sweater for the slightly chilly walks we will take in the evening, after a long day at the beach this summer.


I tried the sleeve on my little L. The perfect fit! I am not sure he was as excited about the sleeve as I was. After examining the loose threads, he quickly decided to take the sleeve off. I hope he will be more impressed with the finished sweater!


Friday, April 5, 2013

The Perfect Crochet Stitch

I have crocheted on and off over the last few years making mostly blankets, and a few baby sweaters when I was expected little L. But a few months ago, while browsing Ravelry, and the crochet magazines at the bookstore in particular the lovely Inside Crochet , I found myself dreaming about all the things I could do with crochet.

In my rediscovery process, I fell in love with a fabulous, yet very simple crochet stitch, the single crochet through the back look while crocheting in the round. By having each single crochet go through the back loop only, the front loop creates little horizontal bars on the front of the work, breaking the traditionally vertical appearance of the crochet posts. The posts as a matter of fact almost seem to disappear. The fabric is soft and flexible and best of all it is perfect for either girl or boy garments.

The sample I am showing you here is knit in Misti Alpaca Cotton silk. It is a sport weight, and I am using an F hook.

This little sample is actually the body of a seamless crochet sweater I am designing for little L. But more on that later.

Wednesday, October 31, 2012

One More Gatsby Vest, and More Knitting

I told you knitting the Gatsby Vest was addictive, and to prove it, here is the latest one I knit for Little Mr. L., my grandson. I wish I could show you a picture of him wearing it, but he lives across the Atlantic. So the picture will have to wait until Christmas when he comes to visit.
For now here is a simple picture. I picked Cascade 220, in Charcoal, and a beautiful currant color.


 I knit it in the 6 months size. It went so fast, I was done in a few hours!

Meanwhile, I have been working on 2 more projects. I have been designing a nice simple fairisle baby jacket, inspired by the fall leaves in New England. I am almost done knitting the prototype.


I used Cascade 220 for this first version, but have decided to use Brooklyn Tweed's Shelter for the final version . I cannot resist the soft colors. I think they will be perfect for this project. I am thinking about offering 2 versions of the sweater in the pattern, a steeked knit in the round version, and a knit flat version ( but still with no seams). What do you think?


The other project is only at the thinking stage. I have been imagining a cushy,double sided cowl, contrasting a solid background, with a lace foreground. I have picked my prototype yarns, Harrisville Designs Shetland.


I think I am going to have a lot of fun!
Happy Halloween everyone!

Friday, October 19, 2012

The Gatsby Vest

I always find it hard to write after a long time with no writing. It is not the I have nothing to write about, just that my writing muscle is asleep, and my inner critic quite ready to strike down each and every sentence I write! But I am determined to share with you my progress on my new pattern, the Gatsby Vest. The knitting is done, the testing is done, and the pattern is undergoing its final editing. I find this the hardest stage, checking and rechecking. My favorite moments when I create a new design, are the moments when I get the inspiration for a new project, the actual knitting (I like to knit the project myself first to see how it feels), and then the photographing.


This was a very fun photo shoot with mr. L., my youngest son modeling. We had a lot of fun playing with pine cones, and running around in the playground. He did not seem too puzzled by the camera, as i you can clearly see! The great thing is that it also showed the vest in action.

 The vest covers the back and the tummy perfectly, and it is comfortable, while giving that classic touch I love so much for young children, and it is perfect for a boy. There are so many wonderful patterns out there for girls, but very few for boys. Not to say that it would not work for a girl, but the simplicity of the lines, details, and colors make it a perfect boy garment. After all, the Great Gatsby inspired the vest! One thing I really enjoyed about knitting the vest, was how easy and fast it was to knit. The contrast between the striped front of the vest, and the solid back, kept me entertained, and before I knew it I had a finished vest for mr. L. to enjoy! The fact that it is knitted using a worsted weight has something to do with how fast it knits up...

OK, back to work on the pattern. I will live you with my favorite picture of mr. L. wearing his vest.


Monday, May 2, 2011

One More Crochet Bombay Love Newborn Jacket

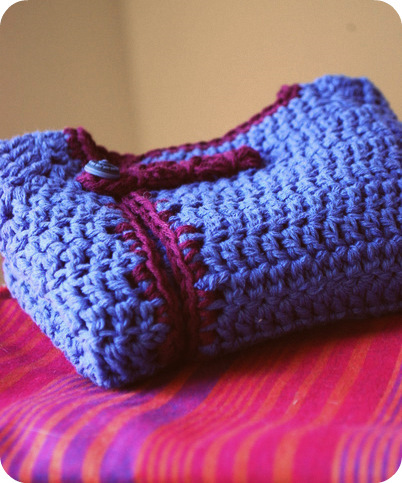
I like the pattern for the Bombay Love Jacket so much, I made another one using more left over Cotton Fleece, this time in a periwinkle blue, trimmed with burgundy.


I found the cutest button for it. I know the button is a flower, and the baby will be a boy, but I just liked it so much!


I am going to sew little pants too. The fabric is simple  mostly burgundy red, with simple dark periwinkle, and subtle orange stripes.
I am a little behind on my sewing though. I had better get started on them!

Friday, January 22, 2010

Sweetheart Baby Slippers (free knitting pattern)

I was going to have the pattern for the Sweetheart baby slippers as a pdf, but my computer had to be completely reinstalled, and the software is not back on yet, so I will just post it to the blog.


Materials:

-Left over worsted weight handspun or commercial worsted weight yarn in 2 contrasting colors. (approx. 1 oz for light color, and 1/2 oz for the contrast or dark color).(I used left over handspun Romney).
-Set of US 5 dpts
-Darning needle

Gauge:

6 stitches per inch in garter stitch on US 5

Instructions:

Make 2 hearts using the dark color(DC).
Cast on 21 stitches.
R1: K9, Sl 1, K2TOG, PSSO, K6, K2TOG, TURN.
R2: Sl 1, K13, K2TOG, TURN.
R3: Sl 1, K5, Sl 1, K2TOG, PSSO, K3, K2TOG, TURN.
R4: Sl 1, K7, K2TOG, TURN.
R5: Sl 1, K2, Sl 1, K2TOG, PSSO, K1, K2TOG, TURN.
R6: Sl 1, K3, K2TOG, TURN.
Repeat R6 until there are 5 stitches left. BO loosely.


Continue as follows to knit the 2 slippers.
With the main color, in my case the lighter one (LC), pick up and knit 20 stitches. You will start picking up at the point where you ended your bind off, you will pick up 10 stitches down the first side of the heart on needle 1, and then 10 stitches back up the other side on needle 2, stopping at the point where you started your bind off, leaving the bound off stitches unused. On needle 3, cast on 20 stitches using the knitted cast on.

Join the round, start with a purl row, then knit in garter stitch until you have six ridges (6 ridges = 12 rows).(To get garter stitch while knitting in the round, you will knit one row, then purl the next).

Break LC, now using DC, purl 1 row.
Next row: K5, K2TOG, K1, K2TOG, K2TOG, K1, K2TOG, K10, K2TOG, K1, K2TOG, K2TOG, K1, K2TOG, K5.
Purl 1 row.
Next row: K5, K2TOG, K2, K2TOG, K10, K2TOG, K2, K2TOG, K5.
Purl 1 row.
Next row: K4, K2TOG, K2, K2TOG, K8, K2TOG, K2, K2TOG, K4.
Purl 1 row.
Next row: K3, K2TOG, K2, K2TOG, K6, K2TOG, K2, K2TOG, K3. (20 stitches)
Purl next 5 stitches.

Use a 3 needle bind off to close the sole of the slipper.
Place 10 stitches on one needle and 10 on another needle. The needles will be on each side of the point of the heart. Using a third needle, bind off loosely. Turn the slipper inside out. The wrong side is now the right side. Weave in all ends.


With LC, starting at the center of the back of the slipper, pick up and knit 2 stitches at the edge of the slipper, *BO 1, pick up 1*. Repeat along the foot opening until you are back where you started ending with BO of the last 2 stitches. Weave in ends.


Happy knitting!

Monday, June 4, 2007

Le Petit Trianon (Free Baby Knitting Pattern)


Once I applied the bow to this newborn/3 months wrap, I found there was something very Versailles about it. So I decided to name it Le Petit Trianon . Le Petit Trianon is an easy pattern to knit. There are no seams, it is mostly stockinette stitch with an ounce of garter. I used a thick and thin chunky yarn by Di Ve called Fiamma, and used US 10.5 needles. The thick and thin gives it a relaxed rustic appearance, in contrast with the proper bow.

Best of all, the thick and thin bulky yarn makes it an express project. Even if the baby shower is tomorrow, you will be done!


Materials: 3 balls Di Ve Fiamma color 29047 (I had about 1 yard left!)

Needles: 24" US 10 1/2, US 10 1/2 dpts

Gauge: 3 1/4 stitches inch
Cast on 90 stitches loosely as the yarn is somewhat fragile. Knitting back and forth, knit 6 rows in garter stitch.
Switch to stockinette stitch for the rest of the body.
Knit even until piece is 3" high (from CO edge.)
Make 1 opening for the ribbon to go through as follows:
(RS)Knit until the last 30 stitches, BO 1, knit till end of row.
Knit the 2 sections separately knitting a total of three rows on each section, cutting and reattaching the yarn as necessary.
Rejoin the sections as follows:
Knit until the gap, CO 1, finish with the same yarn knitting the second section.
Purl 1 row.
Start decreases for edges of the wrap.
Decrease row: K1, ssk, knit to last 3 stitches, k2tog, k1
Next row purl.
Repeat these two rows until there are 80 stitches left. On the last purl row, purl 26, place marker, purl 28, place marker, purl 26.
Looking at the markers, place the 3 stitches before, and the three stitches after the 1st marker on a holder together. Do the same for the stitches around the second marker. Put the body of the sweater aside, and start knitting the sleeves.
Make 2 sleeves:
With US 10 1/2 dpts, cast on 18 stitches, join round, and knit 4 rows in garter stitch. Switch to stockinette. Knit 1 round in stockinette. In next round, K1, Kf&b, knit to the last 2 stitches, Kf&b, k1.
knit 2 rounds, and repeat increase round 1 more time.
Continue even until the sleeve is 4" high. Place the last 3 worked stitches, and the next 3 stitches on a holder, cut the yarn.
Throughout the sweater you will continue the edge decreases as set above.
While keeping the edge decreases, attach the sleeve to the body as follows:
Knit on the body until you reach the stitches placed on hold, take the sleeve, and making sure the held stitches of the sleeve are in front of the held body stitches, place a marker, and start knitting the sleeve stitches with your working yarn, thus joining the sleeve to the body, at the end of the sleeve place a marker, and continue knitting to the second set of held stitches.
Make your second sleeve, and attach it in the same fashion, placing the markers in the same positions.
(You are still knitting in stockinette.) Purl 1 row.
It is now time to start shaping the raglan sleeves.
You will continue the edge decreases as set above while doing the raglan shaping as follows:
Row 1: K1, ssk, knit to 3 stitches of the first marker, ssk, k1, sm, knit to the next marker, sm, k1, k2tog, knit to 3 stitches of the next marker, ssk, k1, sm, knit to next marker, sm, k1, k2tog, knit to last 3 stitche, k2tog, k1.
Row 2: purl
Repeat rows 1 and 2 until piece measures 8" from CO edge.
Now decrease every row for the edge stitches for 5 rows as follows:
Row 1: same as above
Row 2: P1, P2tog, purl till last 3 stitches, take second stitch on left needle, and pass it over 1st stitch, now purl that stitch, p1.
Next row, k2tog throughout row.
Purl 1 row.
BO.
Pick up and knit 30 stitches along neck edge, and knit 1 row. BO loosely.
Use the 3 needle BO for the underarm stitches on holders. Weave in all ends. Sew ribbon at each edge of wrap, right before the beginning of the decreases. Slip bpw through the whole, tie bow.

Wednesday, May 23, 2007

Petit Chou (Free Baby Knitting Pattern)


Here is my Petit Chou (little cream puff, pronounced "shoe").

*******************Corrections have been added to the T pattern*******************


I designed it as a newborn set. The baby will wear it when he or she first meets everyone, and the pieces will become family heirlooms. The project is quick, and simple, with the T being knit mostly in the round. There is minimum seaming. The decorative stitch, inspired by Barbara Walker's Treasury of Knitting Patterns is remarkably simple, and understated. The project is perfect for busy future Moms, Grandmas or friends to knit for a baby shower.
I hope you have as much fun and pleasure knitting it as I did.
As always, I do my best to avoid errors in the pattern, but feel free to leave comments if clarifications are needed.

Materials: Bouton D'Or, Mango, 2 balls Plume, 1 ball Peach (120 yrds each)
16" circular US 2, dpts US 2
Holder
2 yards ribbon
Gauge: 7 stitches/inch


PETIT CHOU SLIPPERS

Make 2.

With Plume cast on 7.
R1: With Plume,Knit
R2: With Plume, K1, purl till last stitch, K1
~~~~~~~~~R3: With Plume, K1f&b, knit to the last 2 stitches, K1f&b, K1
R4: With Plume, K1, purl, end K1
R5: With Peach, *sl1 wyib, sl1 wyif*. Repeat from * to *. End sl1 wyib
R6: With Peach, p1, *sl1 wyib, sl1 wyif*. Repeat from * to *
R7: With Plume, K1f&b, K1f&b, knit till last 3 stitches, K1f&b, k1f&b, K1
R8: Same as R4
R9: With Peach, *sl1 wyif, sl1 wyib*. Repeat from * to *, end sl1 wyif.
~~~~~~~~~R10: With Peach, carrying the yarn around the edge of your work, p1, *sl1 wyif, sl1 wyib*. Repeat from * to *.
R11: With Plume, K1f&b, K1f&b, knit to last 3 stitches, K1f&b, K1f&b, K1.
R12: Same as R4
R13: Same as R5
R14: Same as R6
R15: With Plume, knit
R16: Same as R4
R17: Same as R9
R18: Same as R10

You have now completed all increases and can continue knitting in pattern as follows:
Repeat rows 3 through 10 1 more time BUT DO NOT increase on R3 and R7, just knit.
~~~~~~~~~R3: With Plume, Knit
R4: With Plume, K1, purl, end K1
R5: With Peach, *sl1 wyib, sl1 wyif*. Repeat from * to *. End sl1 wyib
R6: With Peach, p1, *sl1 wyib, sl1 wyif*. Repeat from * to *
R7: With Plume, Knit
R8: Same as R4
R9: With Peach, *sl1 wyif, sl1 wyib*. Repeat from * to *, end sl1 wyif.
~~~~~~~~~R10: With Peach, carrying the yarn around the edge of your work, p1, *sl1 wyif, sl1 wyib*. Repeat from * to *.


You will now split the slipper into 2 parts while keeping the pattern.
R1: With Plume, Knit
R2: K1, P4, BO7, P4, K1
Continue working each side separately repeating rows 3 through 10 from above without increasing. Repeat the pattern a total of 3 more times on each side.

Once the two sides of the slipper are done, reattach plume to the right edge of you work.
K5, CO 7, K5.

You are back on R4 of the pattern. Conitnue in pattern but change R7 as follows: K1, K2tog, K2tog, knit to last 5 stitches, K2tog, K2tog, K1. Go through R10.
Next row: With Plume, K1, K2tog, K2tog, knit to last 5 stitches, K2tog, K2tog, K1.
Next row: With Plume, K1, purl, end K1.
Repeat last 2 rows with Plume one more time. BO.

Make the soles of the slippers as follows:

Peach is used for the entire sole.

Cast on 7 sts.
Knit 1 row.
Purl 1 row.
Next row: K1f&b, knit to last 2 stitches, K1f&b, K1.
Next row: Purl
Next row: K1f&b, K1f&b, knit to last 3 stitches, K1f&b, K1f&b, K1
Next row: Purl
Next row: K1f&b, K1f&b, knit to last 3 stitches, K1f&b, K1f&b, K1.
Next row: purl

Continue knitting the sole in st st, until it is 1/4" shorter than the top of the slipper.
Then continue as follows:
Next row: K1, K2tog, K2tog, knit to last 5 stitches, K2tog, K2tog, K1
Next row: Purl
Repeat last 2 rows one more time.
Knit 1 row.
Purl 1 row.
BO

On the top piece of the slipper, with Peach, pick up and knit 17 stitches, join round, and knit 2 rows in garter stitch, BO loosely.
Seam pieces together, weave in ends. If desired, weave a section of ribbon under the center stitch at the base of the picked up edge, and tie a bow.


PETIT CHOU T

With Peach cast on 100 stitches. Join round. Knit 4 rounds in garter stitch.
Switch to Plume, and in st st until piece measures a total of 4".
With Peach knit 2 rounds garter.
With Plume knit 2 rounds st st.
Eyelet round: *K8, K2tog, YO* Repeat from * to * using Plume.
Knit 2 rounds in st st with Plume.
With Peach Knit 2 rounds garter.
Knit 1 round with Plume.
Add one stitch in next round with Plume.
Transfer the 50 back stitches to a large holder.
Work front of the shirt in pattern, using R3 through R10 of the slipper pattern (without increases). You will be on R5 of the pattern.
~~~~~~~~~R3: With Plume knit
R4: With Plume, K1, purl, end K1
R5: With Peach, *sl1 wyib, sl1 wyif*. Repeat from * to *. End sl1 wyib
R6: With Peach, p1, *sl1 wyib, sl1 wyif*. Repeat from * to *
R7: With Plume,knit
R8: Same as R4
R9: With Peach, *sl1 wyif, sl1 wyib*. Repeat from * to *, end sl1 wyif.
~~~~~~~~~R10: With Peach, carrying the yarn around the edge of your work, p1, *sl1 wyif, sl1 wyib*. Repeat from * to *.

Knit a total of 4 pattern repeats.
Repeat R3.
Bo for neck as follows: K1, P20, BO 8, P20, K2tog.
Continue in pattern on each side of neck (you will be on 9), binding off 4 stitches at the beginning of row 4, and again on row 8. You will be working on 13 stitches.
Conitnue in pattern for 1" from last BO.
Make shoulder band using peach as follows:
Knit 2 rows garter.
Buttonhole row: K3, BO 2, K2, BO 2, K2
Next row: K3, CO 2, K3, CO 2, K3
Knit 2 rows garter.
BO loosely.

For the other side of the neck, the BOs will happen on the knit side on rows 3 and
7. You will need to cut an reattach the Peach yarn to work the pattern. Otherwise, proceed as above.

Pick up and Knit 48 stitches along the neck opening of the front piece with Peach, and Knit an additional 3 rows in garter stitch. BO loosely.

Put the back stitches back on the needles, and knitting with plume, knit in st st until back piece measures 3 1/2" from last Peach garter row. Bind off for neck as follows: K16, BO 18, K15.
Knit each side of the neck separately.
Purl one row.
Next row: BO 3, knit to end.
Purl 1 row.
Continue in st st until you are ready to knit the garter edge, which are positioned as for the front.
With Peach, knit 6 rows garter. BO.

For the other side of the neck, the BOs will be at the beginning of your knit rows.

Pick up and knit 40 stitches along the neck opening of the back side, with Peach, and knit an additional 3 rows in garter stitcth.

Sleeves.

Pin the shoulder pieces in place, matching them as closely as possible, with the buttonholes on top.
Starting at the center of the armpit, pick up and knit stitches along the entire armhole, making sure to go through both layers on the shoulders.
With Plume, pick up and knit 37 stitches, join round, and knit 3 rounds in st st.
Decrease round: K2tog, knit to the last 2 stitches, K2tog.
Knit in st st until sleeve is 3/4", switch to Peach, and Knit 4 rows in garter. BO loosely.
Repeat process on other side.

Weave in all ends, and weave a ribbon through the eyelet holes.


Pattern is for private use only, and may not be reproduced, or used for commercial purposes.